How to Take the Perfect Photo for Your Fake ID
Professional tips to ensure your ID photo looks authentic and passes verification
Start Taking Your PhotoIntroduction
Taking the right photo for your fake ID is crucial to ensure it looks authentic and professional. A poor-quality photo can instantly reveal that an ID is fake, regardless of how well-made the card itself is.
In this comprehensive guide, we'll walk you through every step of taking a perfect ID photo that meets all the necessary requirements for a convincing fake ID.
Step 1: Camera & Equipment
Choose the Right Camera
While professional equipment is ideal, a modern smartphone with a good camera can work perfectly for your ID photo. The most important factors are resolution and clarity.
Recommended Equipment:
- Smartphone: iPhone 11 or newer, Samsung Galaxy S10 or newer
- Digital Camera: Any DSLR or mirrorless camera with 12+ megapixels
- Resolution: Minimum 300 dpi (dots per inch)
Camera Setup Tips
Clean Your Lens
Use a microfiber cloth to ensure the lens is free from smudges and fingerprints.
Use a Tripod or Stable Surface
Camera shake will blur your photo. Use a tripod or place your device on a stable surface.
Set Timer Mode
Use a 3-5 second timer to avoid shaking when pressing the capture button.
Avoid Digital Zoom
Digital zoom reduces quality. Instead, physically move the camera closer to your subject.
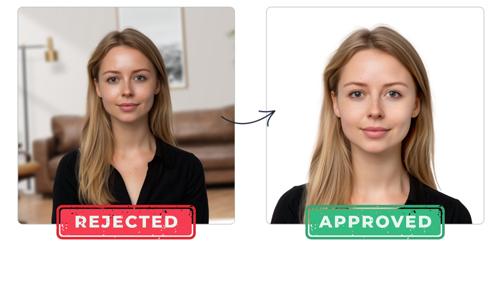
Step 2: Background Requirements
Perfect Background Setup
The background of your ID photo is critical. Most official IDs require a solid-colored background with no patterns, textures, or shadows.
Background Requirements:
- Color: White, light blue, or off-white (check specific state requirements)
- Texture: Completely smooth with no patterns or wrinkles
- Shadows: No shadows on the background
- Size: Large enough to fill the frame behind your head and shoulders
DIY Background Options
- Clean white wall with no decorations
- White sheet or fabric stretched tightly
- Poster board from an office supply store
Background Mistakes to Avoid
- Textured or patterned walls
- Visible doors, windows, or furniture
- Shadows from poor lighting setup
Pro Tip
Stand at least 2-3 feet away from your background to avoid casting shadows. If you don't have a perfect background, you can edit your photo afterward using simple photo editing apps to make the background pure white, but this should be your last resort as editing can sometimes be detected.
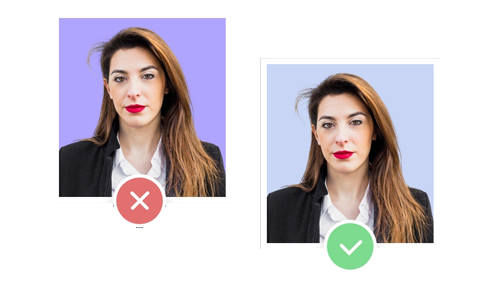
Step 3: Lighting Setup
Perfect Lighting is Essential
Proper lighting is perhaps the most critical element of your ID photo. Bad lighting can create shadows, highlight imperfections, and make your photo look amateur and suspicious.
Lighting Guidelines:
Even Illumination
Your face should be evenly lit with no harsh shadows or bright spots.
Diffused Light
Soft, diffused light creates the most natural and flattering appearance.
No Red Eye
Avoid direct flash that can cause red-eye or harsh reflections.
Natural Color
Lighting should not alter your skin tone or create color casts.
Recommended Lighting Setups
Window Light (Best Natural Option)
Position yourself facing a large window with indirect sunlight. The window should be in front of you, not behind or to the side. If the light is too harsh, hang a thin white curtain to diffuse it.
Three-Point Lighting
For the most professional setup, use three light sources: a main light (45° to your front), a fill light (opposite side, less bright), and a rim light (behind you). This eliminates shadows and defines your face clearly.
Ring Light
A ring light provides even, shadow-free illumination and creates attractive catchlights in your eyes. Position it directly in front of you at eye level for best results.
Avoid These Lighting Issues:
- Overhead lighting causing shadows
- Backlighting that darkens your face
- Uneven lighting from multiple sources
Step 4: Facial Expression
Correct
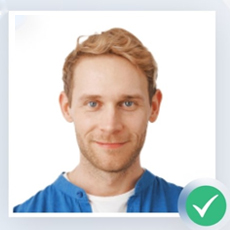
- Neutral expression
- Eyes open & visible
- Mouth closed
Incorrect
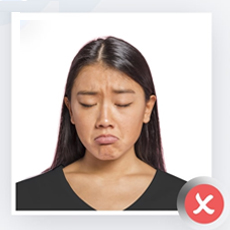
- Smiling/exaggerated
- Eyes closed/squinting
- Head tilted
Perfect Facial Expression
Your facial expression is highly regulated for official ID photos. Most government IDs require a neutral expression with no smiling.
Expression Requirements:
-
Neutral Expression
Keep your expression neutral - no smiling, frowning, or raised eyebrows.
-
Eyes Open and Visible
Your eyes must be fully open, clearly visible, and looking directly at the camera.
-
Head Position
Hold your head straight - not tilted, turned, or at an angle.
Tips for the Perfect Expression
- Take multiple photos to ensure you have options to choose from.
- Practice your neutral expression in a mirror before taking the photo.
- Relax your face completely - don't force a blank expression as this can look unnatural.
- Look directly at the camera lens, not at the screen or a person nearby.
Common Expression Mistakes
- Raising eyebrows or squinting
- Showing teeth or exaggerated smiles
- Looking away from the camera
- Appearing too stiff or unnatural
Step 5: Clothing & Appearance
Dress Appropriately
What you wear in your ID photo can impact how authentic it appears. The right clothing choices help create a professional, government-issued look.
Clothing Guidelines:
- Colors: Wear solid, neutral colors (black, navy, gray, white)
- Style: Simple, conservative clothing with a collar if possible
- Neckline: Ensure your neckline and shoulders are visible
What to Avoid
No Hats or Head Coverings
Unless worn for religious purposes with documentation.
No Sunglasses or Tinted Glasses
Regular prescription glasses are typically acceptable.
No Distracting Patterns or Logos
Avoid clothing with text, graphics, or busy patterns.
Grooming Tips
-
Hairstyle: Wear your hair as you normally do, but ensure it doesn't cover your face or eyes.
-
Makeup: Keep makeup natural and minimal. Avoid heavy foundation or dramatic eye makeup.
-
Facial Hair: Either clean-shaven or well-groomed facial hair is acceptable.
Jewelry & Accessories:
Keep jewelry minimal and non-distracting. Small earrings, thin necklaces, and everyday rings are acceptable. Remove visible piercings other than standard earrings unless they're always worn.
Step 6: Photo Dimensions & Formatting
Getting the Dimensions Right
The precise dimensions of your photo are crucial for an authentic ID. Different IDs have specific requirements, but most follow standard measurements.
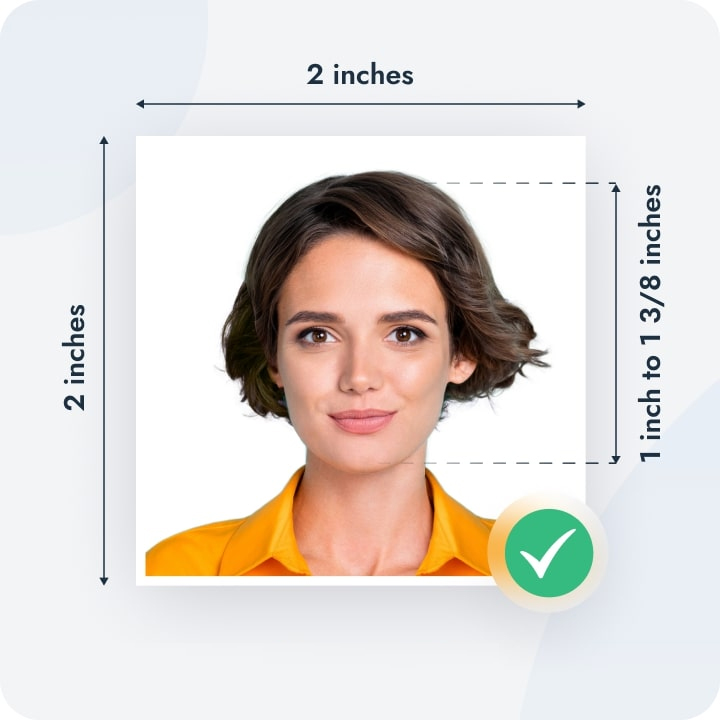
Standard Requirements:
- Size: 2x2 inches (51x51 mm)
- Resolution: Minimum 300 DPI
- Head Size: 1 to 1⅜ inches (25-35 mm) from chin to crown
- File Format: JPEG or PNG
Cropping Tools
Several free tools can help you crop your photo to the correct dimensions:
- Passport Photo Maker - Online tool with ID-specific templates
- Adobe Express - Free online editor with exact measurements
- ID Photo Apps - Smartphone apps specifically for ID photos
Final Checklist
Before submitting your photo, verify these key points:
- Correct dimensions
- Face properly centered
- Proper lighting
- Neutral expression
- Plain background
- High resolution
Dos and Don'ts for ID Photos
DO These Things
-
Look straight at the camera
Keep your head straight with eyes directly facing the camera.
-
Maintain a neutral expression
A slight, closed-mouth smile is acceptable in some states.
-
Use even, diffused lighting
Ensure your face is evenly lit with no harsh shadows.
-
Wear appropriate clothing
Choose solid colors that contrast with the background.
-
Take multiple photos
Capture several shots to choose the best one.
DON'T Do These Things
-
Wear glasses or sunglasses
Even prescription glasses should be removed for ID photos.
-
Use filters or heavy editing
Photo manipulation is easily detected and will invalidate your ID.
-
Wear hats, headbands, or face coverings
Your full face must be visible (religious head coverings are exceptions).
-
Take selfies
Selfies distort facial proportions and look unprofessional.
-
Use flash directly in front
Direct flash causes harsh shadows and red-eye.
Common Mistakes to Avoid
Even with careful preparation, there are several common mistakes that can ruin your ID photo. Being aware of these pitfalls can help you avoid them.
ID photos have specific dimension requirements. The standard size is 2x2 inches (51x51 mm) with the head taking up about 70-80% of the vertical space. Photos that don't match these proportions are immediately suspicious.
Solution: Use an ID photo app or template to ensure correct proportions, or have a professional service crop your photo correctly.
Shadows across the face, particularly under the eyes or chin, create an unprofessional appearance that doesn't match official ID photos.
Solution: Use diffused lighting from multiple angles to eliminate shadows, or take photos near a large window with indirect sunlight.
Official ID photos have consistent quality standards. Photos that are too dark, too bright, blurry, or have color cast issues stand out as fake.
Solution: Use a high-quality camera in good lighting conditions, and adjust white balance settings before taking the photo.
Quick Troubleshooting Guide
| Problem | Solution |
|---|---|
| Red-eye effect | Avoid direct flash, use soft lighting |
| Blurry image | Use a tripod or stable surface |
| Yellowish color cast | Adjust white balance settings |
| Too dark/bright | Adjust exposure settings or lighting |
| Background shadows | Position subject farther from background |
Ready to Order Your Premium Fake ID?
Apply what you've learned and get a high-quality fake ID that looks authentic and passes verification.
Join thousands of satisfied customers
Frequently Asked Questions
Take Your Perfect ID Photo Today
Follow this guide to create a professional-quality photo for your fake ID that will pass all verification checks.